
Choco-Fly Attachment – Electric Propulsion System for Large Sailboats
Every large glider pilot knows that he can only fly with a clubmate. Without a tow plane, the glider usually stays on the ground. Consequently, it’s hardly possible to go for a flight on a whim on a nice evening or a free afternoon. Most readers are surely thinking of an electric powerplant as the solution right now. But which type of powerplant?
The easiest option is certainly to cut off the tip of the fuselage. Quickly glue in a frame, mount the motor, and you’re ready to go. But who would want to cut off the nose of a scale model they’ve built with so much love and effort? Furthermore, this approach has the disadvantage that the pilot must launch the model using a slingshot or by hand. This may work without any problems with smaller models, but when a larger glider is used, a hand launch is not without risk.
Another option is to install a retractable engine. While this is scale-accurate, it involves technical and design challenges, time-consuming maintenance, and high costs.
I continued searching for a more affordable and reliable kit. That’s how I came across motor mounts, which have been gaining popularity lately. I found my solution in the Choco-Fly mount, designed by Peter Aeberli.
After seeing it presented at an IGG get-together, I decided to go with this kit. The installation in my Ventus 2c, with a 5-meter wingspan, went smoothly. The main considerations were the installation angle, the space behind the spar bridge in the fuselage, and the position of the landing gear. Thanks to the included, well-written, and easy-to-understand installation instructions, the work proceeded without any major issues. The only complication was installing my existing Hacker B50 L9, as the holes were designed for the Kontronik Kyra 600. After I corrected these holes, the rest of the work on the Ventus 2c was completed.
| Motor: | Kontronik Kyra 600-20 (formerly Hacker B50 L9) |
| Propeller: | 17×10 inches (Graupner CFRP) |
| ESC: | Kontronik Jazz 55 LV |
| Battery: | KOKAM 4000 mAh 5S LiPo (separate receiver battery) |
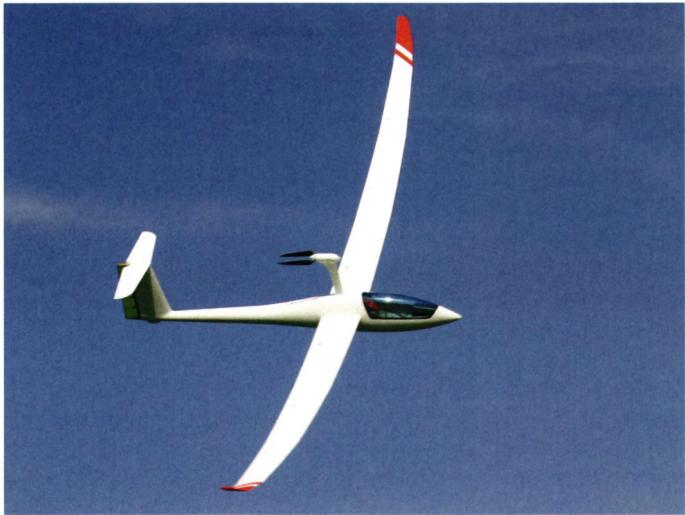
First, I broke in the Ventus 2c as planned without the power unit attached. Then I took off again via F-tow with the Choco-Fly unit installed. As I flew overhead at a sufficient altitude, I started the engine for the first time. The nose of the fuselage immediately dipped, and the model accelerated significantly. After pulling the control stick back slightly to gain altitude, it began to climb. The climb wasn’t exactly impressive, but that wasn’t to be expected given a power output of 560 W and a weight of 6.6 kg. After landing, I added a bit of elevator to the throttle. Once brought up to altitude again via F-tow, activating the electric motor went exactly as I’d hoped. After a quick functional check of all the controls and the motor, I was ready for my first ground launch. With the elevator fully back, I pushed the throttle stick forward. This attempt ended after just a few meters; the Ventus 2c pitched nose-down and became uncontrollable. I was somewhat surprised by this behavior, since the Ventus 2c hadn’t pitched forward during previous taxiing attempts. However, I hadn’t intended to take off at that point and had applied the throttle more tentatively. With this insight in mind, I proceeded to the second takeoff. I tried taxiing slowly and
- Slide the plug-in attachment through the top of the fuselage and into the clamping shaft.
- Propeller clearance from the fuselage is individually adjustable (tighten the screw clamp).
- Center the aluminum U-profile with the O-ring; additionally secure the drive shaft under the top of the fuselage.
- Tighten the 2 Allen screws.
- Connect the motor drive cable to the speed controller—done.
I steadily increased the throttle. The Ventus 2c no longer pitched forward, but I was a bit overwhelmed by the control inputs. Consequently, I had to abort this takeoff attempt as well.
As the saying goes: All good things come in threes. In addition to the gentle roll-out and
the continuous increase in throttle, I now paid more attention to the ailerons and rudder to keep the model aligned with the runway axis. Now I could clearly see the wings beginning to generate lift, and after a few more meters, the Ventus 2c lifted off gently with the elevator fully back. Despite my focus on throttle, ailerons, and rudder, I still wasn’t quite able to keep the model aligned with the runway axis. After takeoff, the elevator must, of course, be gently returned to the neutral position. The entire takeoff procedure takes practice; but by now, my takeoffs are perfect. The noise level of this powerplant in operation is remarkably pleasant.
Some readers will surely wonder how the glider behaves after the engine is shut off. In pure gliding, the additional drag from the engine mount isn’t really noticeable. In speed flying, however,
expect a certain loss. Of course, one must also generally take into account the takeoff weight increase of approximately 1.2 kg due to the engine. In return, you’re now a self-launching large-wing glider pilot.
I’m a big fan of the Choco-Fly attachment and am already installing it in other models. In my opinion, this product is a good choice when it comes to the self-launch solutions described earlier. Installation and removal are quick and easy. After removing the drive, the shaft opening is covered with tape, and the glider is immediately ready for towing or slope flying again, as if it had never been modified. The price of the attachment might seem daunting before purchasing it. However, it’s important to note that a single attachment can be used on multiple models, which is ultimately more cost-effective than purchasing a separate solution for each model. On the website www.chocofly.com, you’ll find pictures of the installation and takeoffs, as well as a contact link. According to the manufacturer, further information, assembly instructions, and a price list will follow as soon as possible. Additionally, more pictures of my Ventus 2c can be viewed in the 2010 gallery under “Flight Operations” at www.mf-varbon.ch.
Patrik Fuchs


News from HEBU

TEAM MANAGER "THIS" BOSSHARD
 Rodito Nussbaumer

YOU KNOW WHAT I MEAN? 125 YEARS OF THE SWISS AERO CLUB
 Emil Giezendanner

F3A EUROPEAN CHAMPIONSHIPS IN ST-MACAIRE, FRANCE
 Matthias Bosshard

52. 2026 ALPS CUP
Emil Giezendanner
PRIDE AND GOOD IDEAS
 Markus Nussbaumer

ATOM, THE NEW DOUBLE-DECKER FROM CPLR
Matthias Bosshard
CORSAIR F4U – A WARBIRD WITH A MEMORABLE LOOK
Jürgen Rosenberger, Jürgen Prinz
SUMMER FUN 2026 AT MG USTER
Martin Wunderli
TRY-OUT DAY AT MFV WETTINGEN
Urs Keller
TWIN TOWN PARTNERSHIP
Wolfgang Voeller
BY YOUTH, FOR YOUTH
Lorena Betschen
SMALL, MODEL-LIKE SAILBOATS
Res Dauwalder
What's New at Leomotion.com

HORIZON HOBBY/LEMACO NEWS: MICRO OV-10 BRONCO 645 MM BY E-FLITE

COUPE DES ALPES – OBSERVE AND LEARN
Rodito Nussbaumer
EURO CONTEST GLIDER ACRO TOUR AUSTRIA 2026

INSIGHTS INTO THE HISTORY OF SEAPLANES

34th HAHNENMOOS ALPINE MODEL AIRPLANE CAMP
Res Dauwalder
WELCOME, NEW MEMBER!
Andrea Bolliger
FREE FLIGHT IN THE MIDDLE OF SUMMER
Urs Muntwyler
THE PC-21 STORY
Emil Giezendanner
NEWS FROM HEBU
 Julia Bucher

FROM 0 TO 100
Markus Nussbaumer
MEMORIES
Wolfgang Völler
NOS REGION – A HUB FOR ELECTRIC AVIATION
Emil Giezendanner
Have you almost forgotten about aircraft that take off and land vertically?
Emil Giezendanner
DO YOU KNOW WHAT I MEAN IN THE LAND OF SMILES?
Emil Giezendanner